Tactile indicators ensure safe, accessible public spaces by guiding visually impaired pedestrians on walkways, crossings, ramps, and platforms. Proper installation is crucial, as misalignment or weak fixing can reduce safety. Our Tactile Installation Guide provides clear, practical steps for contractors, architects, and facility managers to achieve accurate placement, strong bonding, and compliance with government accessibility standards for durable, safe, and professional results.
Tools & Materials for Tactile Installation
Having the correct tools and materials before starting tactile tiles installation or tactile studs installation ensures faster work, better accuracy, and long-term safety compliance.
Warning Tactile & Directional Tactile Indicators
Warning tactiles alerts pedestrians to hazards (stairs, ramps, crossings).
Must comply with local and international accessibility standards.
Ensure uniform height, grip, and consistency before installation.
Store at room temperature 24 hrs before use to improve bonding.
Adhesive or Epoxy (Industrial Grade)
Choose adhesive based on surface type: concrete, stone, tile, metal, or outdoor paving.
Ensure the adhesive is suitable for indoor or outdoor temperature exposure.
Follow mixing ratios and open-time instructions strictly.
Avoid applying adhesive to damp or dusty surfaces.
Moisture and humidity directly affect curing strength — perform a basic moisture check before installation. (Commonly overlooked in SERPs)
Measuring Tape & Chalk / Marker
Used to mark accurate layout, spacing, and alignment lines.
Prevents uneven placement and unnecessary rework.
Helps maintain consistent tactile pattern flow.
Laser marking tools improve accuracy for large commercial projects.
Level and Spacers
Level ensures tactile indicators sit flat and prevent trip hazards.
Spacers maintain consistent gaps between units.
Supports professional finish and accessibility compliance.
Outdoor surfaces must allow proper water drainage to prevent slippery conditions. (Rare safety insight)
Safety Gloves & Knee Pads
Protects hands from adhesives and sharp edges.
Reduces physical strain during long installation hours.
Improves safety, comfort, and productivity.
Why Proper Tools Matter
Ensures precise tactile tiles installation and tactile studs installation.
Reduces installation errors and material wastage.
Improves durability and long-term performance.
Supports safety compliance and professional project delivery.
Placement & Spacing Guidelines
Accurate placement and spacing are key to safe tactile guidance. Even top-quality indicators fail if alignment or orientation is wrong. This tactile tiles placement guide and TGSI installation guide ensure practical, compliant, and durable installation worldwide.
T & L Shaped Junction Placement
This illustrates T-shaped and L-shaped TGSI junctions, where pedestrian movement changes direction or branches at right angles. Directional tactile indicators must lead users directly into the junction, maintaining straight and continuous alignment along the walking path. A warning tactile (dot pattern) zone is placed at the junction decision area to alert users before turning or choosing a route. Directional tactiles extend clearly from the warning zone into each valid path, while non-accessible directions are intentionally left without guidance to prevent confusion. Consistent spacing and correct orientation ensure reliable cane and foot detection at these turning points.
Y & X Shaped Junction Placement
This shows Y-shaped and X-shaped junctions, which represent complex decision points with multiple route options. A centrally positioned warning tactile zone signals the presence of more than one possible direction. From this central area, directional tactiles branch out clearly into each path, maintaining uniform spacing and symmetrical layout. The geometry of the tactile layout helps users distinguish between three-way (Y) and four-way (X) junctions through tactile feedback alone. Accurate alignment and balanced spacing are critical here to avoid misinterpretation of available routes.
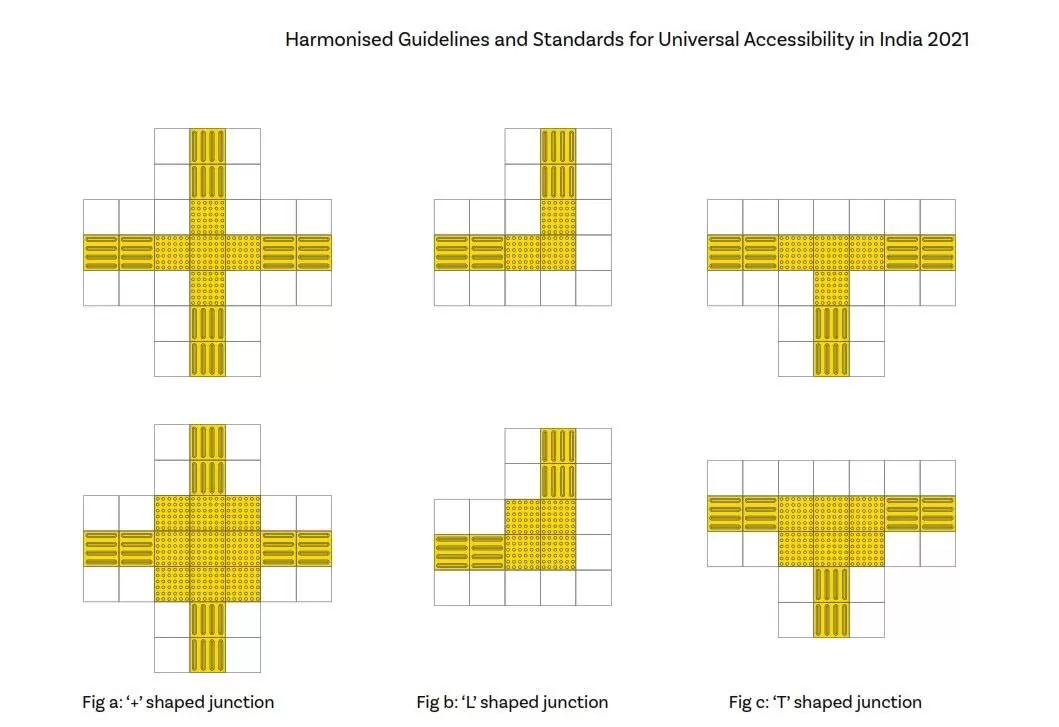
+ Shaped Junction Placement (Cross Intersections)
This depicts + shaped junctions, typically used at full pedestrian crossings or major circulation intersections. Directional tactile indicators approach the junction from all four directions and meet at a centrally defined warning tactile zone. The warning area clearly communicates a major decision point and possible crossing movement. Directional tactiles continue straight through the junction, maintaining equal width, spacing, and orientation on all sides. Proper installation ensures intuitive navigation, safe crossing alignment, and consistent tactile feedback across the entire intersection area.
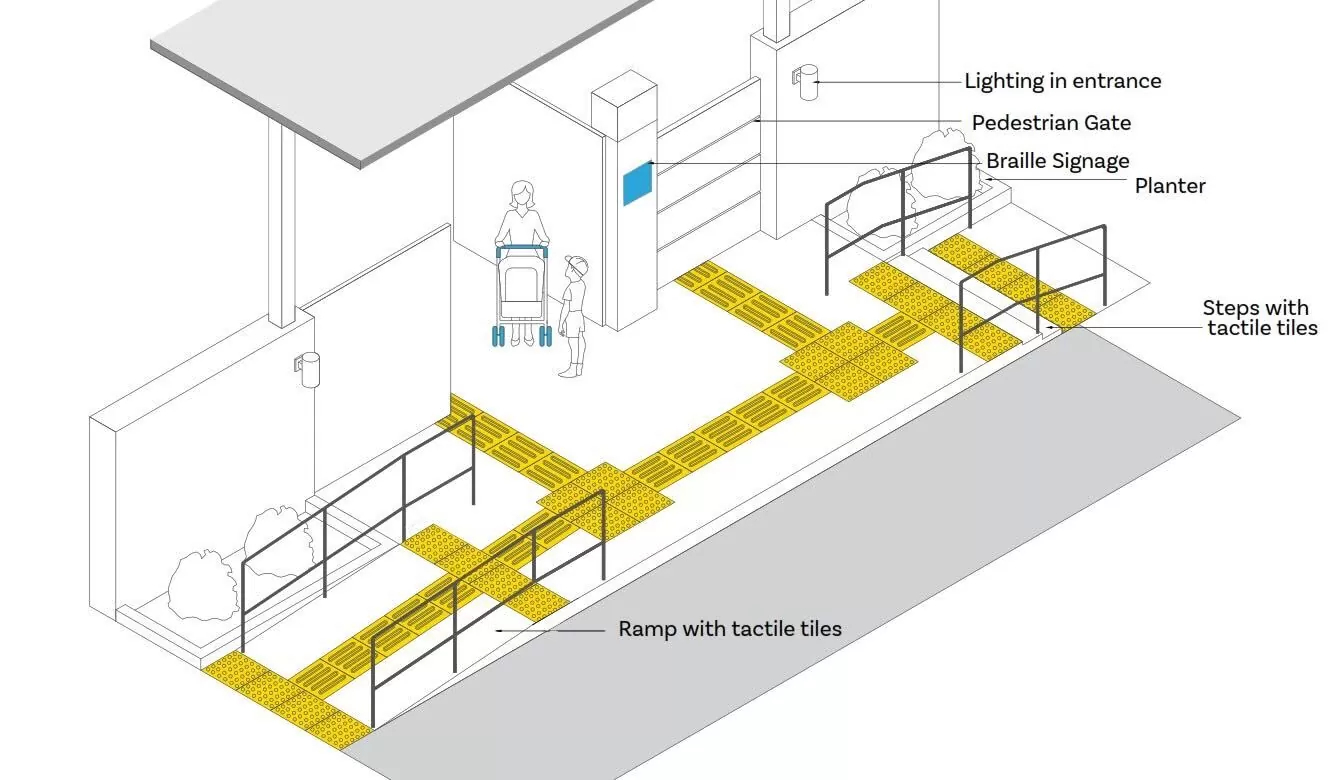
Accessible Entrance, Ramp & Step Integration
This illustrates the integration of tactile guidance at an accessible building entrance, including ramps, steps, gates, and surrounding elements. Directional tactile indicators provide a continuous and intuitive guiding path from the external approach area to the entrance. Warning tactile tiles are installed before ramps and steps to alert users to changes in level, allowing sufficient time for response. Directional tactiles are aligned centrally along the ramp and circulation route, while warning tactiles clearly define the start and end of ramps and stairways. The tactile path is kept free from obstructions such as railings, planters, or street furniture, ensuring safe and uninterrupted navigation. Adequate lighting and the placement of Braille signage further reinforce orientation and accessibility.
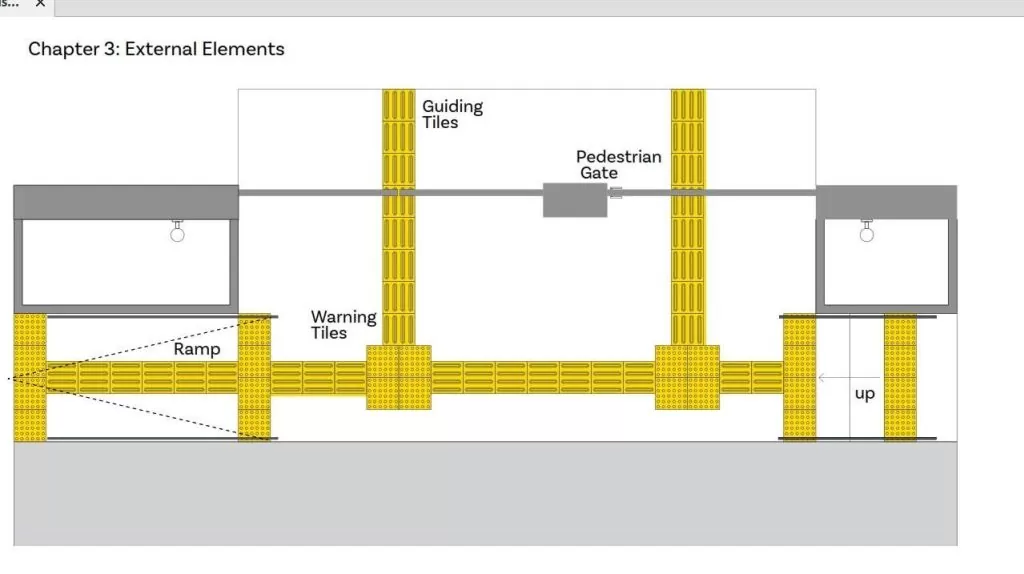
This shows tactile tile placement along an external pedestrian circulation route incorporating a pedestrian gate, ramps, and vertical level changes. Directional tactile tiles guide users directly toward and through the pedestrian gate, maintaining straight alignment and consistent spacing. Warning tactile zones are positioned at key decision points, including before ramps, at gate locations, and prior to upward level changes. Directional tactiles connect seamlessly between ramps, gates, and stair access, ensuring continuity of guidance. The orientation of guiding tiles remains perpendicular to entry points and level changes, enabling clear tactile interpretation. Proper spacing, alignment, and flush installation ensure reliable cane and foot detection while minimizing trip hazards.
Step-by-Step Tactile Installation Guide
Step 1: Layout Planning and Area Assessment
Identify walking paths, hazard zones, ramps, stairways, crossings, and platform edges. Confirm the correct orientation for directional tactile indicators and hazard positioning for warning tactiles. Ensure the layout follows pedestrian flow without obstruction and complies with accessibility spacing standards. Mark the installation area clearly using chalk lines or tape to avoid alignment errors during installation.
Proper planning improves navigation accuracy and prevents costly rework.
Step 2: Surface Inspection and Cleaning
Ensure the surface is flat, dry, and free from dust, oil, grease, moisture, and loose particles. Concrete, tile, stone, and metal surfaces must be thoroughly cleaned to achieve strong adhesive bonding. Repair cracks or uneven areas and apply primer where required for smooth or sealed surfaces.
Surface preparation directly impacts bonding strength and installation lifespan.
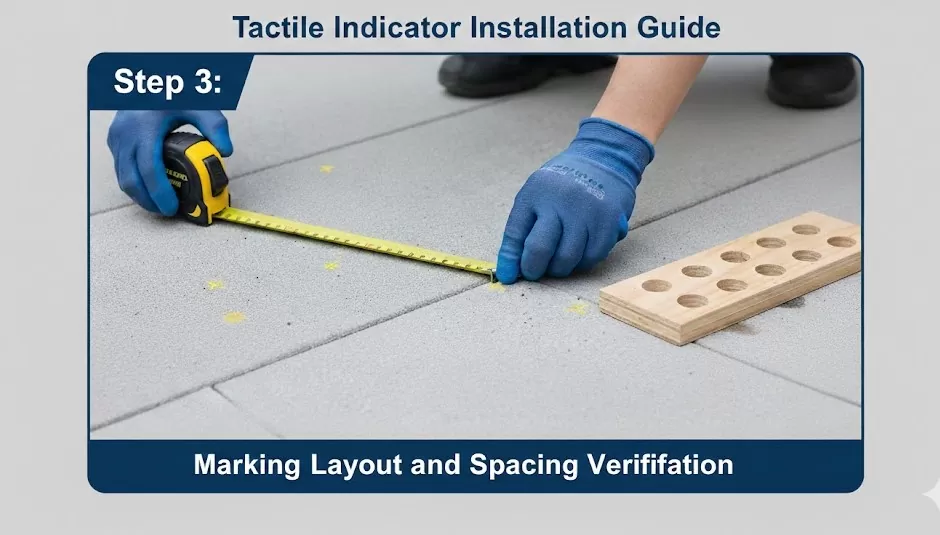
Step 3: Marking Layout and Spacing Verification
Reconfirm layout markings using measuring tape and straight guides. Maintain consistent spacing and alignment to ensure effective tactile guidance and cane detectability. Verify orientation before adhesive application to prevent misplacement.
Correct spacing improves navigation clarity and prevents compliance issues.
Step 4: Adhesive Application
Apply industrial-grade adhesive or epoxy evenly across the marked surface. Follow manufacturer instructions for mixing ratios, open time, and working temperature limits. Avoid air gaps and excessive adhesive buildup to ensure uniform bonding strength.
Temperature and humidity may affect curing performance.
Step 5: Placing the Tactile Indicators
Carefully position tactile indicators along the marked layout. Use alignment guides or spacers to maintain consistent spacing. Press gently initially to confirm placement before final fixing.
Accurate placement ensures safety, accessibility compliance, and a professional finish.
Step 7: Finishing and Final Inspection
Apply sealant if required for outdoor or high-traffic environments. Clean surface residue and smooth edges. Inspect alignment, spacing consistency, and fixing stability. Perform a simple walk test to verify comfort and grip.
Maintenance & Longevity Tips
Cleaning Recommendations
Use non-slip safe cleaning methods.
Avoid harsh chemicals that damage tiles or reduce grip.
Clean with mild detergents and soft brushes.
Remove dirt, debris, leaves from outdoor installations regularly.
Ensure tiles are dry after cleaning to prevent slips and adhesive weakening.
Regular Inspection & Replacement
Inspect tiles for loose, damaged, or worn-out units periodically.
Check for uneven edges or lifting that can cause trips.
Replace damaged tactile indicators immediately.
Document inspections and maintenance for long-term tracking.
Verify both warning and directional indicators for consistency.
Seasonal & Environmental Care
Hot weather: Avoid traffic until adhesive is fully cured.
Cold weather: Ensure the surface is dry, and the adhesive is within tolerance.
Protect outdoor tiles from sun, rain, ice, or snow accumulation.
Adjust the maintenance schedule based on seasonal changes to prevent damage.
Benefits of Proper Maintenance
Extends the lifespan of tactile indicators.
Maintains safety and accessibility for visually impaired users.
Keeps compliance with government and accessibility standards.
Reduces repair and replacement costs.
Ensures reliable, long-term usability of public spaces.
Conclusion
Correct installation of tactile indicators is essential for ensuring safety, accessibility, and compliance with government standards. Properly placed tactile tiles and studs guide visually impaired pedestrians, reduce the risk of accidents, and create inclusive public spaces that everyone can navigate confidently. Following a tactile installation guide with accurate spacing, alignment, and surface preparation ensures long-lasting performance and optimal usability.
For contractors, architects, and facility managers, following these steps precisely ensures professional, reliable results. For projects requiring precision, durability, and compliance, professional installation helps tactile indicators meet government-approved standards and ensure safe, accessible spaces.
A tactile installation guide provides step-by-step instructions for correctly installing tactile indicators, including layout planning, spacing, surface preparation, adhesive application, and compliance requirements. It ensures safe navigation for visually impaired pedestrians and helps contractors meet government accessibility standards.
Tactile indicator spacing depends on local standards such as AS/NZS 1428 or ADA guidelines. Warning studs typically maintain uniform spacing between 300–400 mm, while directional tactiles must align continuously along the walking path. Always verify local regulations before installation.
To install tactile tiles on concrete:
Clean and dry the surface.
Mark layout and spacing.
Apply industrial-grade adhesive evenly.
Position tiles accurately.
Press firmly and allow proper curing time.
Proper surface preparation ensures long-term bonding and safety compliance.
Warning tactile indicators (dot pattern) should be installed before:
Stairs
Ramps
Platform edges
Pedestrian crossings
Hazard zones
Directional tactile indicators (linear pattern) guide pedestrians along safe walking paths. They are commonly installed on:
Walkways
Building entrances
Transit stations
Corridors
External circulation routes
Tactile installations must comply with accessibility standards such as:
AS/NZS 1428.4.1 (Australia)
ADA guidelines (USA)
National Building Code of India 2016
Essential tools include industrial-grade adhesive or epoxy, measuring tape, chalk/marker, level and spacers, plus safety gloves and knee pads. These ensure precise alignment, strong bonding, and compliance during tactile studs installation or tiles.
Place directional tactiles leading into the junction with a central warning zone (dots) for alerts; extend bars into valid paths only, ensuring straight alignment and equal spacing. This prevents confusion at times.
Share This Article
Bhavin Ghelani
February 2,2026
Mr. Bhavin Ghelani is an engineer and entrepreneur passed his engineering from Visvesvaraya Technological University (VTU). Since his adolescence, he has believed in society’s upbringing, and he has always desired to offer some value to society. He also has a religious side too. When in 2015, Our Prime Minister Mr. Narendra Modi started the Accessible India Campaign, also known as the Sugamya Bharat Abhiyan for all the disabled peoples in our country. He saw this initiative as a fantastic opportunity and after lots of deep research, he found the concept of Tactile Ground Surface Indicators which was being already practiced for Visually impaired peoples in countries like, Japan, Australia, New Zealand, Canada, United States of America, and many other developed countries. So at that point, the idea of the formation of ‘Eminent Tactiles’ under ‘Eminent Overseas’ came into his mind. Slowly & Steadily it has become India’s first and foremost manufacturer, supplier & exporter of Tactile Ground Surface Indicator products and under his vision, more range of products kept on developing so far.